
The Problem
If you run Oracle Database on a local Linux VM (VirtualBox or VMware) for learning or lab work, you've probably hit this frustration: every time you switch from your home WiFi to a mobile hotspot or office network, your VM's IP address changes. And with it, you're forced to manually update:
- /etc/hosts
- listener.ora (HOST and IP entries)
- tnsnames.ora
- LOCAL_LISTENER parameter inside the database
There's a permanent fix — and it takes less than 10 minutes to set up.
Root Cause
By default, most VMs are configured with a Bridged Adapter. This means your VM behaves like a physical machine on whatever network your host is connected to — getting its IP from that network's DHCP server. When you move to a different network, the DHCP server is different, and your VM gets a completely new IP.
Oracle's listener, TNS, and database parameters are all IP-bound, so they break every time this happens.
The Solution: Host-Only Network Adapter
The fix is to add a second network adapter to your VM — a Host-Only adapter. This creates a private virtual network between your host machine and your VM that is completely isolated from your external WiFi or LAN. You then assign a permanent static IP on this adapter and point all Oracle configuration to it.
Your first adapter (NAT or Bridged) can stay as-is for internet access. Oracle simply won't use it.
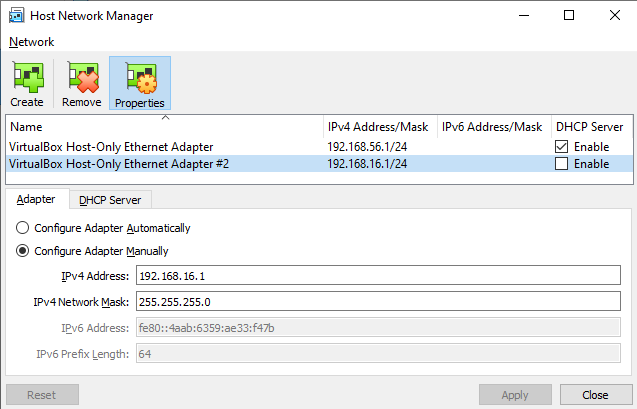
Step 1: Create a Host-Only Network on Your Host Machine
VirtualBox:
Go to File → Host Network Manager → click Create. A new network will appear.
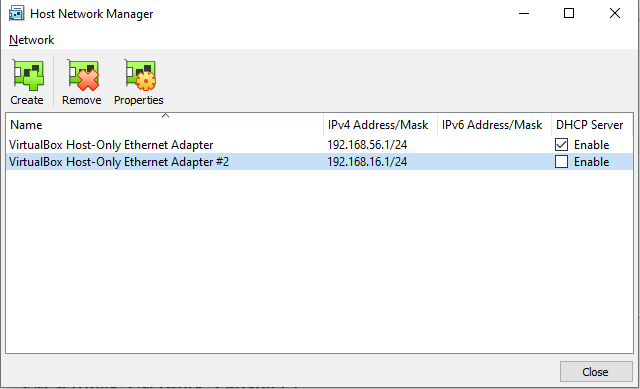
Configure it:
- IPv4 Address: 192.168.16.1
- Subnet Mask: 255.255.255.0
- Disable the DHCP server (you will assign the IP manually inside the VM)
VMware Workstation:
VMware comes with VMnet1 as a host-only adapter by default. You can use it directly or go to Edit → Virtual Network Editor to review/adjust.
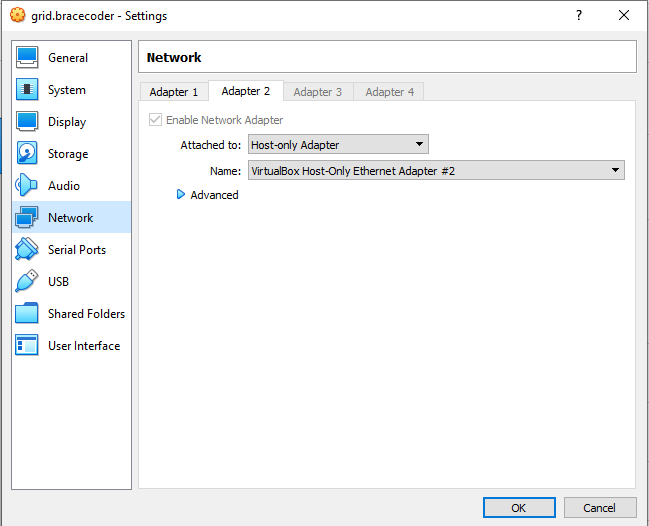
Step 2: Add the Host-Only Adapter to Your VM
VirtualBox:
Go to your VM Settings → Network → Adapter 2 → Enable it → Set "Attached to" as Host-only Adapter → Select vbox host-only ethernet adapter #2.
VMware:
VM Settings → Add → Network Adapter → Host-only.
Keep Adapter 1 untouched. This change only adds a second interface.
Step 3: Assign a Static IP Inside Oracle Linux
Boot your VM and find the new interface name:
Root user:
[root@grid ~]# ip a
1: lo: <LOOPBACK,UP,LOWER_UP> mtu 65536 qdisc noqueue state UNKNOWN group default qlen 1000
    link/loopback 00:00:00:00:00:00 brd 00:00:00:00:00:00
    inet 127.0.0.1/8 scope host lo
       valid_lft forever preferred_lft forever
    inet6 ::1/128 scope host
       valid_lft forever preferred_lft forever
2: enp0s3: <BROADCAST,MULTICAST,UP,LOWER_UP> mtu 1500 qdisc pfifo_fast state UP group default qlen 1000
    link/ether 08:00:27:5a:29:91 brd ff:ff:ff:ff:ff:ff
    inet 192.168.1.103/24 brd 192.168.1.255 scope global dynamic noprefixroute enp0s3
       valid_lft 86323sec preferred_lft 86323sec
    inet6 2401:4900:338d:d2dc:f611:609d:53c0:398e/64 scope global dynamic noprefixroute
       valid_lft 7197sec preferred_lft 2697sec
    inet6 fe80::2f05:b310:bf2d:6c53/64 scope link noprefixroute
       valid_lft forever preferred_lft forever
3: enp0s8: <BROADCAST,MULTICAST,UP,LOWER_UP> mtu 1500 qdisc pfifo_fast state UP group default qlen 1000
    link/ether 08:00:27:3a:fd:5c brd ff:ff:ff:ff:ff:ff
4: virbr0: <NO-CARRIER,BROADCAST,MULTICAST,UP> mtu 1500 qdisc noqueue state DOWN group default qlen 1000
    link/ether 52:54:00:1f:6e:52 brd ff:ff:ff:ff:ff:ff
    inet 192.168.122.1/24 brd 192.168.122.255 scope global virbr0
       valid_lft forever preferred_lft forever
5: virbr0-nic: <BROADCAST,MULTICAST> mtu 1500 qdisc pfifo_fast master virbr0 state DOWN group default qlen 1000
    link/ether 52:54:00:1f:6e:52 brd ff:ff:ff:ff:ff:ff
[root@grid ~]# vi /etc/sysconfig/network-scripts/ifcfg-enp0s8
[root@grid ~]# nmcli connection reload
[root@grid ~]# nmcli connection up enp0s8
Connection successfully activated (D-Bus active path: /org/freedesktop/NetworkManager/ActiveConnection/5)
[root@grid ~]#
[root@grid ~]# ip a show enp0s8
3: enp0s8: <BROADCAST,MULTICAST,UP,LOWER_UP> mtu 1500 qdisc pfifo_fast state UP group default qlen 1000
    link/ether 08:00:27:3a:fd:5c brd ff:ff:ff:ff:ff:ff
    inet 192.168.16.10/24 brd 192.168.16.255 scope global noprefixroute enp0s8
       valid_lft forever preferred_lft forever
    inet6 fe80::a00:27ff:fe3a:fd5c/64 scope link
       valid_lft forever preferred_lft forever
[root@grid ~]# cat /etc/sysconfig/network-scripts/ifcfg-enp0s8
TYPE=Ethernet
BOOTPROTO=none
NAME=enp0s8
DEVICE=enp0s8
ONBOOT=yes
IPADDR=192.168.16.10
PREFIX=24
[root@grid ~]#
[root@grid ~]# cat /etc/hosts
127.0.0.1   localhost localhost.localdomain localhost4 localhost4.localdomain4
::1         localhost localhost.localdomain localhost6 localhost6.localdomain6


192.168.16.10 grid.bracecoder grid
[root@grid ~]# ping 192.168.16.10
PING 192.168.16.10 (192.168.16.10) 56(84) bytes of data.
64 bytes from 192.168.16.10: icmp_seq=1 ttl=64 time=0.057 ms
64 bytes from 192.168.16.10: icmp_seq=2 ttl=64 time=0.048 ms
64 bytes from 192.168.16.10: icmp_seq=3 ttl=64 time=0.048 ms
^C
--- 192.168.16.10 ping statistics ---
3 packets transmitted, 3 received, 0% packet loss, time 2084ms
rtt min/avg/max/mdev = 0.048/0.051/0.057/0.004 ms
[root@grid ~]#ip aLook for a new interface that is DOWN or unconfigured - typically eth1 or enp0s8.
Create the interface configuration file:
vi /etc/sysconfig/network-scripts/ifcfg-enp0s8Add the following content (adjust interface name if different):
TYPE=Ethernet
BOOTPROTO=none
NAME=enp0s8
DEVICE=enp0s8
ONBOOT=yes
IPADDR=192.168.16.10
PREFIX=24
Bring the interface up:
nmcli connection reload
nmcli connection up enp0s8Verify:
ip a show enp0s8You should see 192.168.16.10 assigned. This IP will persist across reboots and network changes because it is not tied to any DHCP server.
Step 4: Update /etc/hosts — One Last Time
[root@grid ~]# vi /etc/hosts
[root@grid ~]# cat /etc/hosts
127.0.0.1   localhost localhost.localdomain localhost4 localhost4.localdomain4
::1         localhost localhost.localdomain localhost6 localhost6.localdomain6

192.168.16.10 grid.bracecoder grid
[root@grid ~]#Step 5: Update listener.ora
Open your listener configuration file (typically under $ORACLE_HOME/network/admin/listener.ora or $GRID_HOME/network/admin/listener.ora for Grid/RAC setups):
LISTENER =
  (DESCRIPTION_LIST =
    (DESCRIPTION =
      (ADDRESS = (PROTOCOL = TCP)(HOST = 192.168.16.10)(PORT = 1521))
    )
)lsnrctl stop
lsnrctl start
lsnrctl statusStep 6: Fix LOCAL_LISTENER in the Database
Connect to your database as SYSDBA and update the parameter:
ALTER SYSTEM SET LOCAL_LISTENER =
  '(ADDRESS=(PROTOCOL=TCP)(HOST=192.168.16.10)(PORT=1521))'
SCOPE=BOTH;Verify it:
SHOW PARAMETER LOCAL_LISTENER;If you are running a Data Guard setup, also review tnsnames.ora entries for your primary and standby services and replace any dynamic IPs with 192.168.16.10 (or the equivalent static IP of your standby VM if you have one).
How It All Fits Together
┌──────────────────────────────────────────┐
│          Oracle Linux VM              │
│                                       │
│ enp0s3 → NAT/Bridged → changes freely │  ← internet / package downloads
│ enp0s8 → Host-Only   → 192.168.16.10  │  ← Oracle listener, TNS, hosts
└──────────────────────────────────────────┘
                  │
192.168.16.1 (your host machine)The external adapter handles internet traffic. Oracle is completely bound to the internal static adapter and never sees your WiFi changes.
Bonus Tip: Multiple VMs (Data Guard / RAC Lab)
If you are running a multi-VM lab (e.g., a primary and standby for Data Guard, or multiple nodes for RAC), assign sequential static IPs on the same host-only subnet:
| VM Role | Static IP |
|---|---|
| Primary DB (dg1) | 192.168.16.10 |
| Standby DB (dg2) | 192.168.16.11 |
| RAC Node 1 | 192.168.16.20 |
| RAC Node 2 | 192.168.16.21 |
All VMs will always be able to reach each other over the host-only network, and cross-VM TNS and Data Guard redo transport will never break due to network changes.
Summary
The host-only adapter approach is the standard way to run stable Oracle labs on a laptop or desktop. Once configured, you completely eliminate the IP change problem. Your Oracle environment becomes portable - you can carry your laptop anywhere, connect to any network, and your lab just works.
This setup is especially valuable if you are working toward Oracle certifications and need a stable, always-available environment to practice Data Guard switchovers, RAC administration, RMAN backups, and other hands-on tasks without constant reconfiguration interrupting your focus.
Comments
0Please sign in to leave a comment.
No comments yet
Be the first to share your thoughts!